View other positions
Learn from the Pro's
Flankers come in a variety of shapes and sizes and it's not a bad thing to have a difference between the two on the pitch. The experienced teams would most likely have at least one tall flanker, with both offering strength, toughness, speed, skill, and an affinity for getting very close to the action and making tackles and competing at the breakdown. At most levels you probably should have a specialist blind-side flanker (#6) and an open side flanker (#7). Which means that they switch sides of the scrum depending on where it is. And each with different roles. More on that below.
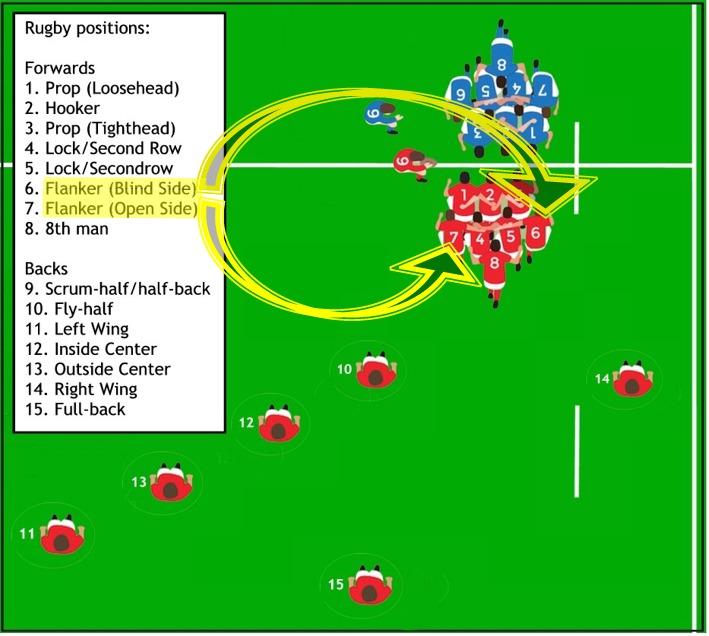
Take a look at the graphic here: Flankers (blind side/open side). When we refer to the "blind-side" flanker, or small side, or the side closest to the touchline; it is usually the #6. The "open-side" flanker, the one always on the larger side; it is usually the #7. Again, at scrum-time these two usually switch for them to always be on the blind, or open side.
Open-side #7
When defending a scrum, it's an open-side flankers job to get out to the opposition backline as soon as possible, in an attempt to minimize any tackles his flyhalf would have to make. Additionally, he must strive to be the first at the breakdown, and try to win opposition ball, or at least strongly compete (slow their ball down). From an attacking scrum, the No.7 will usually be the first forward at the attacking breakdown and will be tasked with securing quick, clean ball. From a defensive lineout, he will usually shoot off of the tail to put pressure on the opposing No.10, and then chase the ball. From an attacking lineout, he will usually be on the shoulder of his team-mate, ready to carry the attack on, and/or help secure ball at the breakdown for quick recycling to continue movement.
Blind-side #6
Scrum-time defense for a blind-side flanker means firstly defending the blind/short side, i.e: any short-side moves, #8 picks, #9 snipe etc. These are the main responsibility of a blindside flanker. Thereafter they join the rest of the pack in defense: They have one of the highest work rates in the team, they will spend most time running in support, sprinting short distances, they will perform multiple tackles and hit some 45 or 50 rucks and mauls in a game! From attacking scrums (and other phases of play, for that matter), he joins the rest of the pack in the battle to create some go-forward and get his team on the front foot. More of a ball-carrier, the No.6 is often used to pound the gain-line and get the defence going backwards or to clear opponents out of rucks.
In the lineouts, the #7 if often one of the taller players and used as a jumper.
There are no hard and fast rules to the roles of each of the #6 & #7 players. In general: they compete for the ball – most commonly in rucks and mauls. Flankers also assist in pushing in a scrum, but are expected to detach from the scrum as soon as the ball is out to get to the play before the opposition's forwards. Flankers also participate in line-outs, either being lifted to contest or win possession, or to lift other players. Flankers are usually the key participants in the tackling process. The flankers, especially the openside, are often the fastest forwards on the team but still relied upon for tackling. Both must love getting to the rucks at speed and competing the breakdown.
